Interested How to make your own rock climbing hand holds for a fraction of the price of buying them? Review Outlaw provides a quick and easy process of making custom hand holds much cheaper than purchasing them. Make your own climbing holds from the exact same materials that major rock climbing handhold companies use and save yourself some money!
Here is what you will need: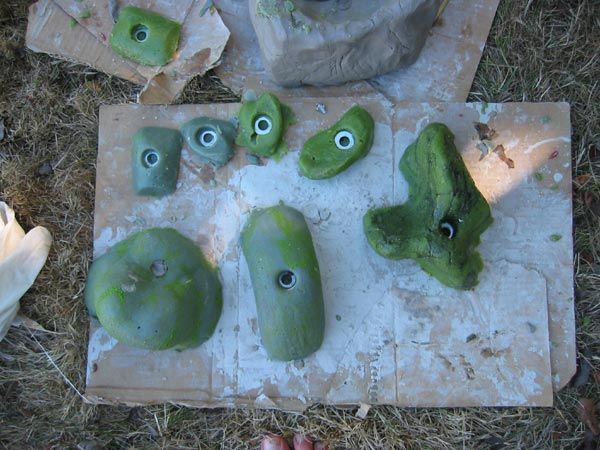
– 1 Block of Clay ($5-15 bucks great if you have a student id for that 10% 🙂
– Bondo Fiberglass Resin (I find getting the 1 gal size is managed easier aprox $20 bucks at home depot)
– Extra Fiberglass resin Fixer (about $2 to 4$ get one or two extra per gallon of resin)
– Play Sand or fine Silica sand (silica works better don’t get anything with pebbles or rocks in it, starts at $5 to $10)
– 3/8″ Washers (about .50 cents ea you need 1 to 2 a hold)
– 3/8″ Mason drill bit for drilling the holes
– a can of WD40
 Step 1 – Clay
Get a block of clay (6″ x 6″ by 12″ is aprox 20lbs depending on the clay type) It can be cheap clay; don’t go out spending a arm and a leg on expensive sculptures clay it’s just not needed. We will start with cloning a commercial hold first its easier to start with as your first try. Find a commercial hold and cut a slice off of the clay deep enough to accommodate the depth of the hold. Push the hold straight down into the clay with the back of the hold facing up, it is REAL important that you transfer the texture to the clay mold. At this point carefully remove the hold from the clay. Need to be careful not to smudge the texture so this may take a few tries at first. If the plug from the bolt hole breaks off roll a new one from some extra clay by hand. Place a 3/8″ washer on top of the bolt hole peg, this is EXTREEMLY important.
Now you want to Spray the finished mold with WD40, this will act as a agent to prevent the poured mixture from sticking to the mold.
Step 2 – Bondo
Here comes the fun part mixing up the bondo resin. This stuff reeks, so do it in a well ventilated area and you might want to wear a respirator I wouldn’t  recommend breathing it in. I like to set up a fan behind me blowing towards my work area to blow the fumes away from me. You are going to Guestimate how much sand would fill up the entire mold and roughly measure that volume of sand in ounces to determine how much of the mix you need to fill the mold. So now based on that measurement you want 60% sand and 40% bondo mix. The process make your own rock climbing hand holds is almost done!
The first thing you want to do is mix the resin and the fixing agent one drop at a time before adding the sand. It is important to measure the volume of resin carefully so that you can calculate the right amount of fixer to add. The more fixer you add the faster the holds will setup. I generally use the amount suggested but try not to use less.
Now you need to work FAST, the clock is ticking as you only have about 15mins before the resin begins to set and harden!
If you want to add some color to your holds now is the time, acrylic paint works best and you want to add this in before the sand as well. Make sure you get
 creative 🙂
One you have all this done and you are set to go on pouring the sand in you want to do this slowly. You want to stir as your pour it in to avoid getting clumps or pockets of dry sand. The sand grains need to all get wet by the mix. The 60/40 mix is a good guideline but keep adding sand until it seems as if more sand would make the mix to dry to work with.
Step 3 – Let it set
Now we can pour the mix into the molds. It is a good idea to have some small holds around in case you mix too much mix so you don’t waste any. Pour up to the top of the mold filling it to the brim.
Now we can pour the mix into the molds. It is a good idea to have some small holds around in case you mix too much mix so you don’t waste any. Pour up to the top of the mold filling it to the brim. Let the holds cool and set for 1 to 3 hours, this varies based on how much fixer you added. Its ready when the top is hard but the hold is still a bit warm. If you pull it out too early it will damage the texture.
At this point the resin/sand mix is still a bit soft so any little irregularities you can cut off with a knife, I like to use a utility knife. This point you can smooth off the back of the hold by scraping it on any rough surface like the sidewalk 🙂
Step 4 – Drilling
At this point you want to take your holds to a drill press or you can eyeball it and use a hand drill with that 3/8″ mason bit we bought earlier. You want to drill down past the washer. Even though the bolt peg got us a starter hole it will never go all the way. So now you just have to let it harden a few hours (let it cure) and bolt them on your wall.
Happy Climbing 🙂
You now know How to make your own rock climbing hand holds, let me know if you are going to try it in the comments or this is just Crazy!
 Follow